
Github, Gitlab, Bitbucket are all web interfaces for git. They all do similar things that add on features that aren’t implicit in git, like issues and wiki, etc.
Unbeknownst to some, fossil is an alternative to git that actually has built-in issues, wiki, and easily self-hosts. This is a quickstart to get started with hosting and cloning fossil repos. The official quickstart is very good, although I realized a few tricks in getting the fossil hosting to work on HTTPS behind a reverse-proxy and getting fossil to work with Go.
Before you begin
First, download fossil. There are already binaries available for fossil.
New fossil
Make sure to save each fossil repo with the extension .fossil - this is very important if you want to do hosting.
Now you can make a new fossil with the init subcommand.
> fossil init -A schollz 3.fossil
project-id: 7165366dc9d0d3c827573c8ef12cb760f2caa236
server-id:  56adcebbf59b06eb4b621d3daca59f5aa87a9a08
admin-user: schollz (initial password is "35a6g1")
This will make a new repository, 3.fossil, with a user schollz and default password 35a6g1. You can then change the default password for schollz. Here you have to enter the password on the command-line, but I like to add it to a file to prevent it from showing up in the bash history.
> vim pass # enter your password in this file
> fossil user password schollz `cat pass` -R 3.fossil
> rm pass # this ensures your password doesn't enter the bash history
Want to add another user? Its also easy:
> fossil user new user2 user2@somewhere.com -R 3.fossil
Hosting fossils
Say now you have several fossils in the same folder. Make sure that each has the .fossil suffix - this is very important.
> ls fossils
1.fossil 2.fossil 3.fossil
Then you can start a server that uses HTTPS:
> fossil server . --https --port 8079 --repolist
The --https flag implies HTTPS, so you have to host a reverse-proxy that uses SSL. Its super easy to do this if you are using Caddy as a reverse-proxy (which easily adds HTTPS). In this case your Caddyfile will look like:
fossil.schollz.com {
        proxy / 127.0.0.1:8079 {
                transparent
        }
        gzip
        log logs/fossil.schollz.com.log
}
where you just replace fossil.schollz.com with yourdomain.com.
Cloning fossil
Cloning is easy, just make sure to include your user name so you will have the rights to push changes (unless you want to just have your own copy). If you are using “fossil server .” like above, then you need to add /repo to tell it you want to clone repo.fossil. For instance, to clone 3.fossil
fossil clone https://schollz@fossil.schollz.com/3 3.fossil
You will be prompted for the password, which is the same password that you set up top. Now you can open the repo.
> fossil open 3.fossil
Things are then pretty similar to git. You can add and commit files:
> touch README.md
> fossil add README.md
> fossil commit README.md # this will automatically push
You can easily create pull (get latest changes):
> fossil sync
Private and public repos
Private repos
It’s pretty easy to make your fossil private. Just goto Admin -> Security Audit and then click “Take it private”.
Public repos
This is the default. However, sometimes if you take your repo private you’d like to make it public again. Making your repository public again is a little more involved.
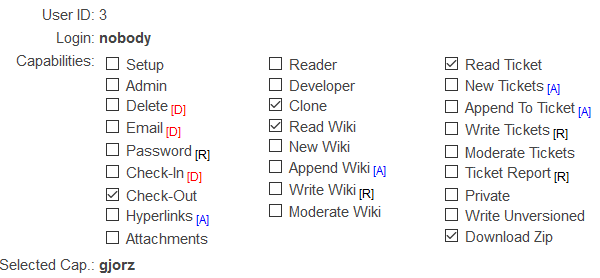
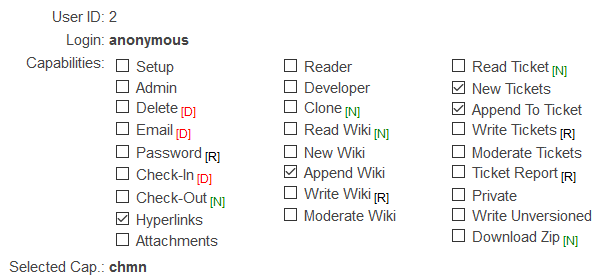
Basically there are two types of users: “nobody” and “anonymous” users. The “anonymous” refers to permissions given to anyone who logs in. The “nobody” refers to the permissions given to anyone who visits the site. To make a repo public again you have to redefine the permissions for both these types of users by going to Admin -> Users.
The typical permissions for “nobody” for public access are “gjozr”:
The typical permissions for “anonymous” for public access are “chmn”:
Configure for Go
In order to use fossil with go get you need to make sure you have the right remote import paths specified in the meta tag.
Basically, if you are following the above and you have a fossil repo hosted at https://yourdomain.com/hello-world then you need to include the meta tag:
<meta name="go-import" content="yourdomain.com/hello-world fossil https://yourdomain.com/hello-world">
You can do this by changing the default fossil skin (Admin -> Skins). There is a really nice Google Code skin available. For convenience, I already have the CSS, Header, and Footer. Just edit each component (Step 4 under Skins) and then check both boxes in Step 7 and hit “Publish Draft1”.
General
I like to have the README.md in the main repo be the first thing you see on the web UI - just like Github/Gitlab/Bitbucket. To do this, make a README.md file and then goto Admin -> Configuration and look for the Index Page and change it to /doc/tip/README.md. Make sure to then press “Apply Changes” at the top.
Another trick - you can add fossil as a parameter to your ~/.zshrc if
you are using oh-my-zsh (if you aren’t using it, why?). Just make sure
you have this line:
plugins=(git history fossil)